Description
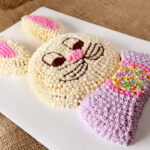
An easy bunny cut-up cake using two 8" cake layers and only two cuts. Uses the star fill frosting technique that is perfect for beginners.
Ingredients
Scale
- 1 standard cake mix, any flavor, prepared and cooled using the directions for 2 8" round cakes.
- 2 sticks unsalted butter, room temperature
- 3 cups powdered sugar
- 1 tsp vanilla extract
- 1 tsp almond extract
- 1/4 tsp salt
- 1-2 TBS milk or cream
- Food coloring for frosting (pink, brown/black, green, purple, or whatever you like)
- Additional sprinkles or decorations as desired
Instructions
- Use the photos in the blog post to cut one of the cake rounds into ears and a bowtie as shown. Arrange cake pieces on a cake board or baking sheet covered with aluminum foil or parchment.
- Use a hand or stand mixer to blend together the butter, powdered sugar, vanilla extract, almond extract, and salt. Add the milk or cream a little at a time until frosting isn't too thick and spreads easily.
- Measure out about 1/3 cup of the frosting into a small bowl and add drops of black or brown food coloring until desired color is reached.
- Use a pastry bag fitted with a small round writing tip - such as Tip #3 - and pipe facial features using the brown/black frosting.
- Use a toothpick to trace out the shape of the nose and what will be the interior (pink) part of the ears.
- Use a clean pastry bag fitted with star tip #17 and fill the bag with the white frosting. Hold the bag at 90 degrees from the cake and pipe close-fitting stars across the entire cake layer with the face, and also the outer parts of the ears, leaving the inner part you marked off bare.
- Measure out a small amount of remaining white frosting and color it pink. Use a clean piping bag fitted with the same #17 tip and pipe stars into the nose shape and into the center of the ears.
- Color remaining frosting as desired for the bowtie and pipe stars across the top and sides of the cake. You may choose to leave a circular section in the middle bare to spread with frosting and top with sprinkles.
Notes
Number of servings will vary with the size of the slices. 8 inch cakes will generally yield 8 - 14 servings each.
- Prep Time: Varies
- Cook Time: 35 mins
- Category: Dessert

