
This is an excellent cake decorating technique for beginners that results in a really impressive cake! I'm the perfect person to make that claim, because while I love making tasty food, I usually don't get too caught up in tedious decorating. And if I'm being honest, I'm not very good at decorating either!
So, if I can make this cake, I promise that you can, too!

"I'm easy to make!"
I used the food coloring and sprinkles that I already had in my baking cabinet, but you can get as creative as you want with your bunny, especially with his cute bowtie! You can use things like M&Ms, gumdrops, Twizzlers, etc to add embellishments.

What Do I Need To Make This Cake?
- Any box cake mix in any flavor, as long as it can be baked into two 8" rounds.
- Two round 8" cake pans. I've used these basic Wilton pans for years and I love them.
- Frosting ingredients: butter, powdered sugar, vanilla/almond extract, a teensy bit of salt, and some milk or cream.
- At least 4 piping bags, a small round piping tip, and a star piping tip (I like #17)
- Food coloring for the bunny head, inside of ears and nose, eyes and whiskers, and bowtie.
- Colored sprinkles or other embellishments - you can be as creative as you want with your bunny!
Since I knew a significant amount of time would be spent decorating the cake, my kids were running rampant, and I was also cooking a full dinner for us for Easter, using a cake mix was ideal. And... I really love the texture of a box cake. It's so nostalgic and comforting. You can use a homemade cake recipe as well as long as it makes enough for two round 8" layers. But I did make the frosting from scratch, because canned frosting is kind of icky and doesn't pipe well at all.

My favorite cake pans (find on Amazon)
![]()
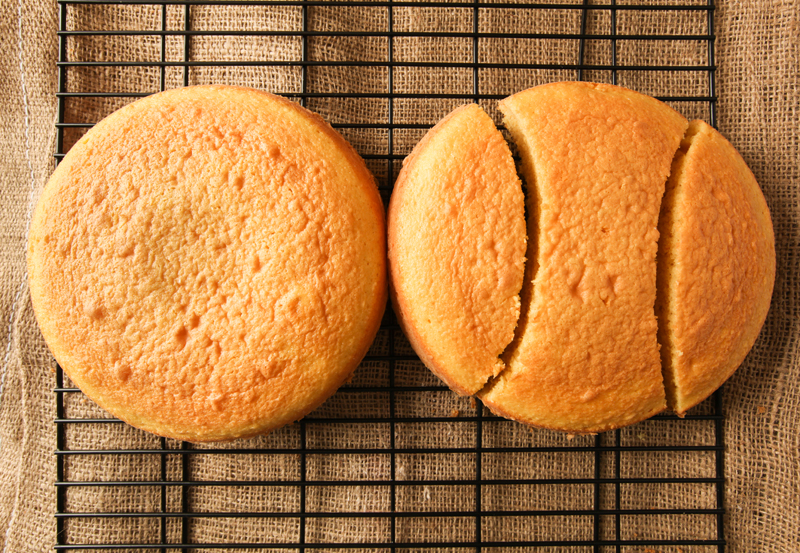
First, cut one cake like this.
How Do You Cut A Cake To Look Like A Bunny?
Once the two 8-inch cakes have fully cooled, you'll cut one of the cakes as seen in the photo above.
You want the cuts to be as even as you can so that the resulting outer pieces are the same size. I used a toothpick to score the cut lines before going at it with a knife - don't worry if you have to make several score lines, they'll be covered up with frosting!
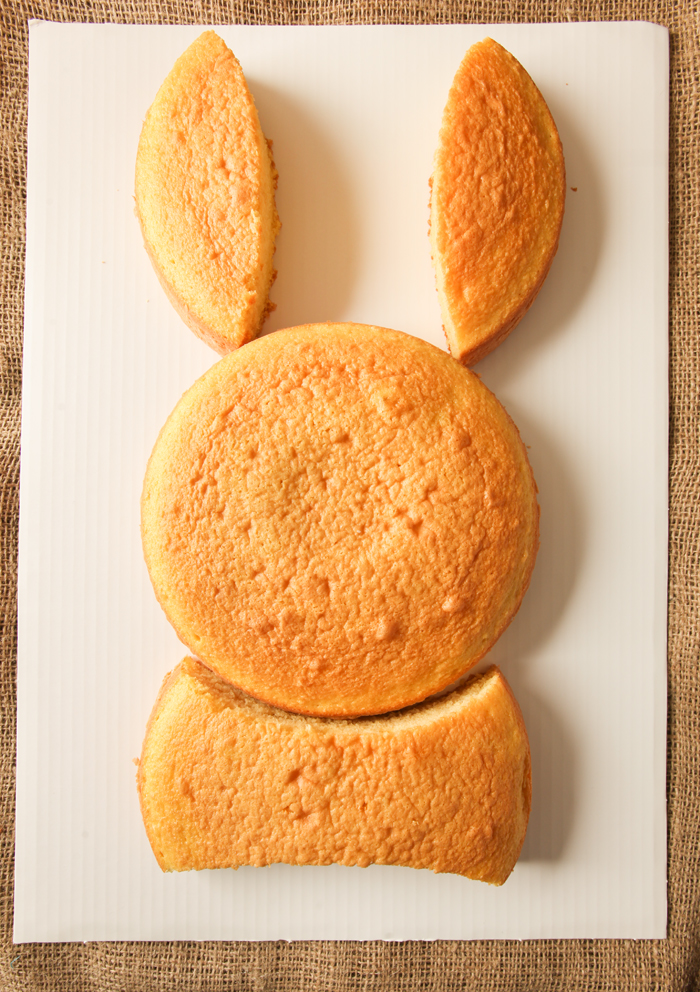
Then voila, it's a bunny!
Then on a cake board or baking sheet covered with aluminum or parchment, arrange the pieces as seen. Voila! It's a bunny!

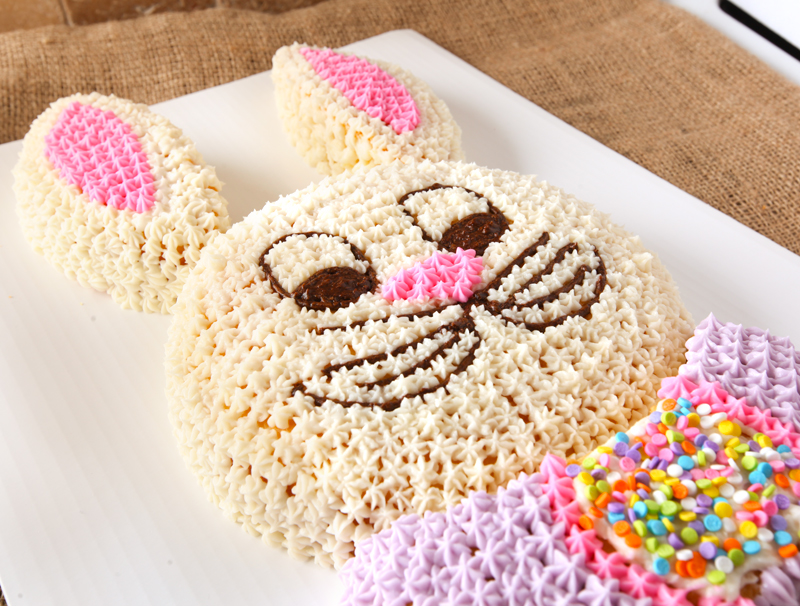
How Do I Pipe The Face?
The first thing I did was pipe the face onto the bunny head. I used a small round tip. I made a rough outline using a toothpick and didn't worry too much about it being perfect, because when you start piping the frosting stars a number of sins will be hidden.
You can make your bunny eyes oval or round, and you could even use colored frosting for the irises to add extra color! You could even add eyebrows in different shapes to give him some expression. Angry Easter Bunny, perhaps?
What Kind Of Frosting Do I Use For A Star Fill Cake?
Canned frosting does not pipe well, so I made a simple American buttercream, which is way more delicious anyway.
I used real butter, so my frosting isn't 100% snow white. If you want a snow white bunny, you may want to use a Crisco/shortening based frosting instead. I prefer the taste of butter-based frostings, so I was totally fine with my bunny being off-white.
Pure vanilla extracts will also tint pure white frostings. If you want to keep it snow white, you can use only almond extract or use an imitation vanilla.
When mixing your frosting, make sure not to add too much milk as the frosting will be too thin and limp to hold the star shapes. If you do end up with a thin frosting, just add some extra powdered sugar a little at a time to thicken it up.

Using the star fill-in technique is much more forgiving than trying to get a perfectly smooth frosting or using other advanced piping techniques. I love how the stars resemble fluffy fur, too!
Let me know if you try this and make sure to tag me/my blog on social media if you give it a try! Enjoy!
Print
Beginner Easter Bunny Cut Up Cake
An easy bunny cut-up cake using two 8" cake layers and only two cuts. Uses the star fill frosting technique that is perfect for beginners.
- Total Time: Varies
- Yield: 16-24 servings 1x
Ingredients
- 1 standard cake mix, any flavor, prepared and cooled using the directions for 2 8" round cakes.
- 2 sticks unsalted butter, room temperature
- 3 cups powdered sugar
- 1 tsp vanilla extract
- 1 tsp almond extract
- ¼ tsp salt
- 1-2 TBS milk or cream
- Food coloring for frosting (pink, brown/black, green, purple, or whatever you like)
- Additional sprinkles or decorations as desired
Instructions
- Use the photos in the blog post to cut one of the cake rounds into ears and a bowtie as shown. Arrange cake pieces on a cake board or baking sheet covered with aluminum foil or parchment.
- Use a hand or stand mixer to blend together the butter, powdered sugar, vanilla extract, almond extract, and salt. Add the milk or cream a little at a time until frosting isn't too thick and spreads easily.
- Measure out about ⅓ cup of the frosting into a small bowl and add drops of black or brown food coloring until desired color is reached.
- Use a pastry bag fitted with a small round writing tip - such as Tip #3 - and pipe facial features using the brown/black frosting.
- Use a toothpick to trace out the shape of the nose and what will be the interior (pink) part of the ears.
- Use a clean pastry bag fitted with star tip #17 and fill the bag with the white frosting. Hold the bag at 90 degrees from the cake and pipe close-fitting stars across the entire cake layer with the face, and also the outer parts of the ears, leaving the inner part you marked off bare.
- Measure out a small amount of remaining white frosting and color it pink. Use a clean piping bag fitted with the same #17 tip and pipe stars into the nose shape and into the center of the ears.
- Color remaining frosting as desired for the bowtie and pipe stars across the top and sides of the cake. You may choose to leave a circular section in the middle bare to spread with frosting and top with sprinkles.
Notes
Number of servings will vary with the size of the slices. 8 inch cakes will generally yield 8 - 14 servings each.
- Prep Time: Varies
- Cook Time: 35 mins
- Category: Dessert
Do you like this tutorial and want to able to find it easily later? Consider pinning the image below to your Pinterest boards or sharing on social media using the images at the top and bottom of this post. Thank you for visiting!

Say Something About This Post: