

(Click To Jump Directly To Recipe!)
Everyone needs a go-to recipe for soft, luxurious dinner rolls, and this right here is a good 'un. Try them once and I promise you these will be your go-to any time you want perfect from-scratch yeast rolls on your dinner table.
What Do I Need To Make Yeast Rolls?
- Whole milk
- Butter
- Eggs
- All-purpose flour
- Active dry yeast (not instant yeast)
- A little salt and sugar
Can I Substitute Any Of The Ingredients?
These rolls use a rich yeast dough - meaning it has added fat content in the form of eggs, butter, and milk - ensures these rolls are tender instead of chewy with robust flavor throughout. While you can technically use a low fat milk, your rolls will seem dryer and not as tender as they will be if you use whole milk.
As for the flour, I recommend a medium protein all-purpose flour. Most standard all-purpose flours in the grocery store will fit the bill, though the White Lily brand in particular is a low protein flour that's ideal for more delicate baked goods (cakes, fluffy biscuits, etc). You can use bread flour - which has a higher protein content - for a more chewy roll.
You can use salted butter instead of unsalted, just reduce the amount of added salt to ¾ tsp.
How Long Should I Knead The Bread Dough?
Because these rolls are classically prepared with kneading the dough and a double rise, it does take some advance planning to time things properly. Weekends are an ideal time to whip up a batch of homemade rolls for a special Sunday dinner. Luckily, most of the prep time is hands off while allowing the dough to rise, so while making these rolls takes some patience, this is an easy recipe at its core. A bonus is that they will make your whole house smell amazing during the whole process, because not too many things smell better than yeast dough and fresh-baked bread.
There's no hard and fast rule for how many minutes you should knead bread dough, but you'll want to knead until the dough is smooth and stretchy. For these rolls, kneading by hand should take 3-4 minutes, and just a tad shorter if using the dough hook of your stand mixer. You can always add a little bit of flour if your dough is too wet and is unable to be handled, but make sure to only add it a teeny bit at a time to avoid adding too much and changing the texture of your rolls.

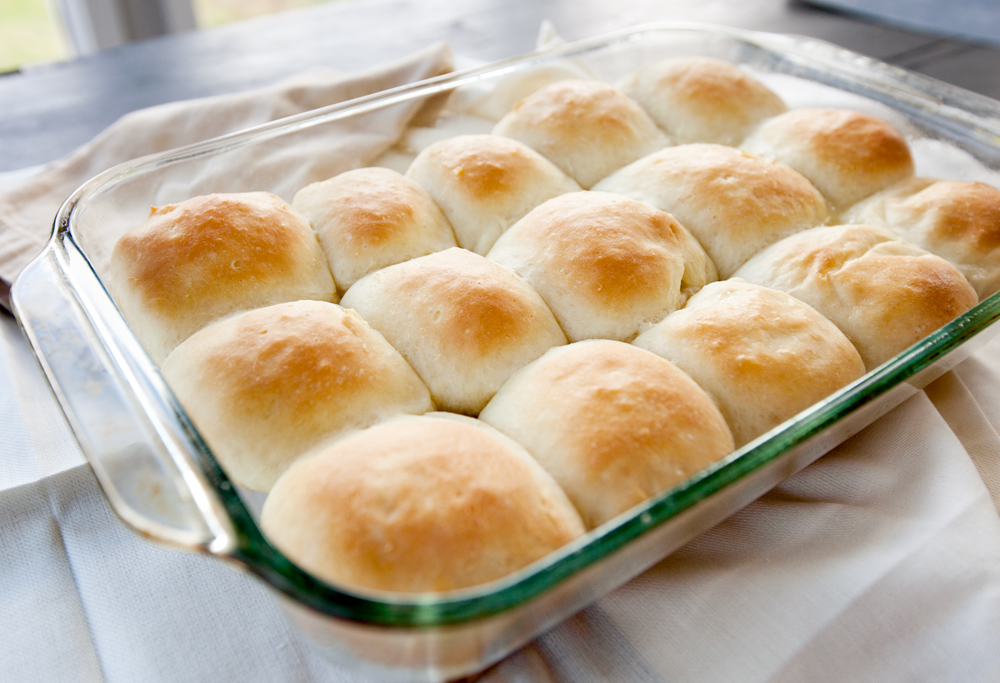
What Kind Of Pan Should I Use For Yeast Rolls?
I find that these rolls bake up best in a glass 9x13 baking dish. You can use metal if that's all you have, though your rolls may begin to brown earlier and become darker than you'd like before the rolls are done. To counteract this, keep an eye on them and tent with aluminum foil if they brown too quickly.

Pyrex 9x13 glass dish (Find On Amazon)
![]()

I tried to include some useful notes in the recipe below to help your rolls turn out their very best. Please read through the instructions thoroughly before starting and feel free to ask me any questions in the comment section below. I hope you give these a try!
How To Make Soft Yeast Dinner Rolls
Print
Soft Yeast Dinner Rolls
Fluffy, soft yeast dinner rolls using simple ingredients. This will be your go-to recipe for yeast rolls!
- Total Time: 3 hours 40 mins
- Yield: 15 rolls
Ingredients
- 1 cup whole milk*
- 1 packet (2 ¼ tsp) active dry yeast
- 2 TBS white granulated sugar, divided
- 1 large egg
- Half stick (¼ cup) unsalted butter, room temperature
- 1 tsp salt
- 3 cups all-purpose flour**
Instructions
- Proof the yeast: Using a microwave or stove, warm the milk to about 110F - it should feel warm when you test it with your finger, but should not hot. Remove from heat or microwave and add the yeast and 1 TBS of the sugar. Cover and let stand for about 5 minutes or until it starts to look foamy.
- Make the dough: Add the foamy yeast mixture to a large mixing bowl or stand mixer bowl fitted with paddle attachment. Add the remaining 1 TBS sugar, egg, butter, and salt. Mix until the butter is combined, and then add 1 cup of the flour. Mix on low until combined, scrape down the sides, and then gradually add the rest of the flour and beat on medium speed until a dough forms. The dough should be relatively sticky but should still be able to be handled without too much fuss. If the dough is too loose, add more flour 1 TBS at a time, beating well after each addition, until dough is tacky but able to be handled.
- Scrape down the bowl and paddle and fit the mixer with the dough hook OR turn the dough out onto floured surface. Knead the dough using the mixer for 2-3 minutes or knead by hand. The dough should be stretchy and smooth.
- Oil a second mixing bowl and place the dough into the bowl, turning once to coat all sides. Cover and place in a very warm environment to rise for 1-2 hours or until at least doubled in size. ***
- Make the Rolls: When the dough is finished rising, grease a glass 9x13 baking dish and set aside. Turn the dough out onto a lightly-floured surface and punch it down to release the air. Pat it out into a square and use a large knife or bench scraper to cut into 14-16 equal pieces.
- Shape the rolls by gathering a section of dough in your hand, holding it on the bottom with your fingers. Pull sections of dough from the side to down under the dough ball, creating a smooth surface on top. Place dough balls into the prepared pan, smooth side up, leaving a little space in between each one. It's okay if they aren't all identical. Cover the rolls and let them rise again for about 1 hour or until nice and puffy.
- About 15 minutes before the end of the second rise, preheat your oven to 350F. When the rolls are ready to be baked, loosely tent them with aluminum foil and bake for about 15 minutes.
- This will prevent too much browning early on in the bake. Remove the aluminum foil and continue to bake for another 5-7 minutes or until the rolls are done and golden brown.
- Brush the warm bowls with melted butter if desired, and let them cool for a few minutes before taking them out of the pan so that the steam doesn't build up condensation and make the bottom of the rolls soggy. Serve warm. Store leftovers in airtight container at room temperature for 2-3 days.
Notes
* While you can use a lower fat milk, be aware the texture will not be as tender and soft due to the lowered fat content.
** It's important not to over-measure the flour. Spoon flour into your measuring cup and level off with a knife - do not dunk the measuring cup directly into the flour, as this will pack it down and cause you to use more flour than intended.
*** If your home is chilly, preheat your oven to 150F and then turn it off. Leave the door cracked for about 5 minutes and then place the covered dough inside.
- Prep Time: 3 hours 15 mins
- Cook Time: 25 mins

Do you want to save this recipe when the craving for pillowy carby goodness hits? Use the image below to Pin to your Pinterest boards or, even better, use the buttons at the top and bottom of this post to share on social media. Thank you for visiting my blog!

Say Something About This Post: