
As many of you know, I struggle with making "pretty" food. Each time I try, there seems to be some hang up along the way that sends my brilliant (not really) ideas into droopy lopsided pitifulness. However, I was determined to make a birthday cake for Matt and his dad, and figured it was the perfect opportunity to try making something as pleasing to the eye as it is to the palate.
I still encountered some problems, as you'll no doubt notice when you see the finished product, but I did finally learn how to successfully flatten and stack a somewhat level layer cake. Here's what I did...
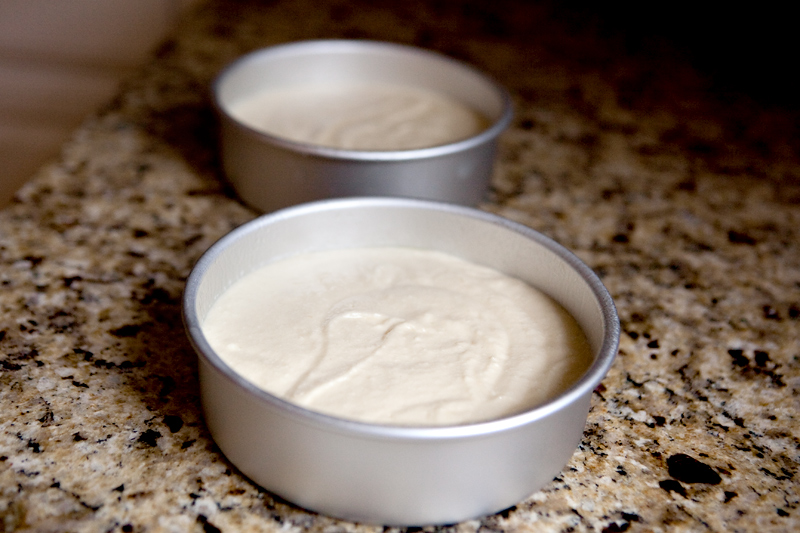
I started with a couple o' 6 inch cake pans, filled only halfway with vanilla buttermilk cake batter. The recipes for everything I used are at the bottom of this post. I whacked the pans on the counter a few times to let any air bubbles rise to the top.

Once the layers were baked, I let them cool for about 15 minutes on a wire rack, while still in the pans.

I use 3 things to determine cake done-ness:
1. A clean toothpick inserted in a few different places on the cake.
2. A golden but still moist top.
3. Edges that are just slightly starting to pull away from the pan.

After the cakes cooled for a bit, I removed them from the pans. To do this, I placed one hand flat against the top of the cake and inverted the pan in my hands. The layer came right out. Depending on the size of your cake, however, you may want to use a large flat pan instead of your hand. My cake was small, only 6", so it was easy to hold the entire layer in one hand.
Once removed from the pans, the layers went back onto the wire rack to finish cooling completely. I added a layer of parchment paper to prevent wire marks on the cake bottoms.
Next, we'll need to cut off the domed top of each layer so that our cake will stack evenly. I use this cake knife from Wilton![]() that makes this step a cinch.
that makes this step a cinch.

I placed one layer on a cardboard cake circle. This'll allow you to easily move the cake around once it is stacked. Then, I crouched down so that I was eye level with the cake. I put one hand flat on top of the dome while holding the knife in the other hand, parallel to the counter. Slowly (because you don't want to mess up the edges of the layer) cut across the top and whack that dome right off.
I'm sure you'll find something to do with the leftover piece. I haven't the slightest clue what that might be, but you're a smart group of peeps. You'll think of something.

Now it's time to add your filling! You can either add a flavored filling, or you can fill it with whatever frosting you are using for the outside of the cake. I used a simple chocolate buttercream, and spread on a good layer using an elongated spatula.
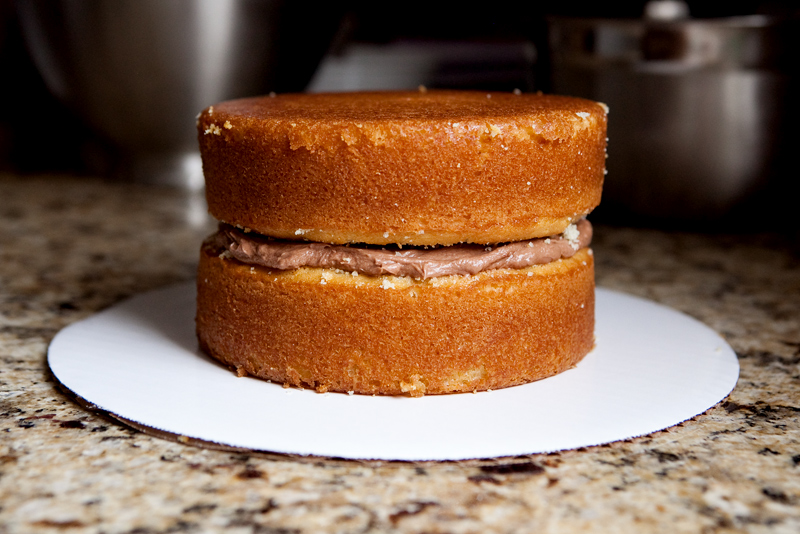
By this time, you should have leveled off your other layer as well. You'll want to invert that layer and place it on top of your filling, so that the bottom is facing upwards. This gives you the flattest possible surface on the top of the cake. This seems like such an obvious step, but I can't tell you how many cakes I've made where I simply stacked both layers on top of each other, crumb-side up. You can imagine the crumbs that would get into my frosting as a result of that.
So there you have it.. an easy way to stack a level cake! The next step is to add the frosting on the outside, and that's your chance to fill in any gaps between the layers and the filling and give you nice even sides. This is where I knew I would have difficulty. I struggle with frosting consistency and usually end up with lumpy sides. I also tend to use too much pressure when frosting the outside, which ends up knocking my top layer off-center and makes the whole thing lopsided.
All of those above things happened with this cake. Sigh. I'll get there one day.

I used a vanilla buttercream using 100% butter, so it was getting a little droopy and needed to chill. Here's my lumpy, slightly lopsided cake hanging out in the fridge for a lil' while before serving.
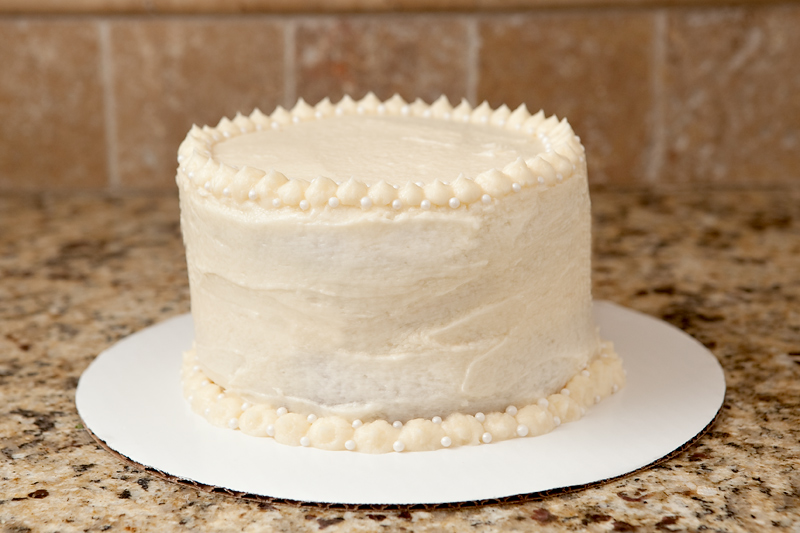
The silver lining is that it was super tasty.. buttercream is one of the most delicious substances on Earth, don't you agree? I could eat a vat of it just by itself! The little pearls are these luster decorating pearls from Williams-Sonoma. Matt gave them to me in my stocking last Christmas and I'm finally getting a chance to use them!
Overall, I think I finally have a handle on stacking layers, and I'll continue to learn how to successfully frost a cake without making things all lopsided and uneven. I'll conquer this feat one day, I'm sure of it!
Here's your recipes! I used my favorite recipe for vanilla buttercream, and the cake came from Smitten Kitchen.
PrintVanilla Buttermilk Cake
- Yield: Two 6-inch by 2-inch layers
Ingredients
- FOR THE CAKE:
- 2 cups plus 1 tablespoon (240 grams) cake flour (not self-rising)
- 1 teaspoon baking powder
- ¾ teaspoons baking soda
- ½ teaspoon salt
- 1 stick (½ cup) unsalted butter, room temperature
- 1 cups (200 grams) granulated sugar
- 1 ½ teaspoons pure vanilla extract
- 2 large eggs, at room temperature
- 1 cup buttermilk
- FOR THE BUTTERCREAM
- 1 cup (2 sticks) butter, softened
- 3 cups powdered sugar
- ½ cup heavy cream
- 2 teaspoons pure vanilla extract
- Cocoa to taste (optional - for chocolate filling)
Instructions
- FOR THE CAKE
- Preheat oven to 350°F.
- Generously grease or spray two 6-inch round cake pans.
- Sift together flour, baking powder, baking soda, and salt in a medium bowl. In another mixing bowl, beat butter and sugar together until pale and fluffy.
- Add vanilla extract and mix well.
- Add eggs 1 at a time, beating well. You may need to scrape down the bowl a few times.
- With mixer on low, beat in buttermilk until just combined (mixture will look curdled).
- Add flour mixture in three batches, mixing lightly until each addition is just incorporated. Do not over-mix.
- Fill each pan halfway with batter, and then whack the pans on the counter a few times to release air bubbles.
- Bake until tops are moist and golden and a toothpick comes out clean, about 30 minutes, but your oven may vary.
- Cool cakes in pans for 15 minutes on a wire rack.
- Remove from pans and continue cooling on racks covered with parchment paper until completely cool.
- FOR THE BUTTERCREAM:
- Combine all ingredients in a large mixing bowl and beat until smooth and creamy. This usually takes just a few minutes.
- You can add small amounts of cream to the frosting until it reaches the consistency that you desire.
- For the chocolate filling, separate some of the frosting and add powdered cocoa a tablespoon at a time, mixing and tasting after each addition until desired flavor is reached.
agen fiforlif murah
fantastic issues altogether, you simply gained a brand new reader.
What would you suggest in regards to your put up that you just
made some days in the past? Any certain?
Roger
Great recipe. I made these cakes for a cake decorating course and they turned out perfect.
Erin
I'm so glad to hear that! 🙂
proxy list daily
Hi there,I log on to your blog named "How to Stack Cake Layers | Vanilla Buttermilk Cake | Brownie Bites Blog" regularly.Your humoristic style is awesome, keep it up! And you can look our website about proxy list daily.
Pokemon - Fire Red Version (J)
no Android, show de bola. Tentem encontrar torrent Pokedroid, é espetáculo, a Nintendo tentou banir e Esse
é início da sua proeza. Você inicia em um caminhão. http://vlinne.com/blogs_post.php?id=14765
Bobbie
Excellent post. I used to be checking constantly this blog and I'm inspired!
Extremely helpful info specifically the ultimate phase 🙂 I deal with such information much.
I used to be looking for this particular info for a long time.
Thank you and good luck.
tracie p
hello! so does this recipe make a 9 inch round layer cake too? i see the the 6 inch layers are pretty thick. or would it make a 9 by 13 sheet cake? i've been searching for a good buttermilk yellow cake recipe!
melissa
A trick I use when frosting a 6" cake... I poke a bamboo skewer or a 1/4" dowel through the center of the top of cake once it's stacked. This gives you a bit of a "handle" to hold while frosting, as well as keeps everything aligned when you do the sides. 😉
Sarah
I have the same problem when frosting the outsides of cakes, especially if there is large spaces between layers (usually because I'm a fail at leveling even with a tool haha). Then I figured out that if you fill a piping bag with the frosting and squeeze that into the layer space, you have an instantly smooth surface to do the edges. After you fill the cakes and stack them, chill them so they don't move. Also - dirty icing = the baker's best friend, since it keeps the surface from looking lumpy. Dirty ice, then chill, then do the final coat. I find standing on a stepstool gets me to the right height for my counter when it comes to the sides. If you're really needing a fancy cake, a $1 frosting comb makes the sides deliberately ridged in a professional way and covers up any errors!
I'm loving the looks of your cake though, good work!
Lisa
mmmmmm
I have never been able to properly level a cake layer. Gave up and moved on to cupcakes. lol I always thought Vanilla Buttercream was the bomb until I tried MARSHMALLOW Buttercream this weekend. WOW!