

I was brainstorming some ideas for upcoming blog posts and wasn't coming up with anything particularly creative. Then I decided to put creativity aside for the moment and take it all the way back to the basics, such as baking a delicious loaf of homemade bread.

I wanted my bread to have a nice crunchy crust on the outside, perfect to eat warm sliced directly from the loaf, or also ideal for further toasting under the broiler. I tried a new technique of baking no-knead dough in a preheated Dutch oven, with the lid on, to create that perfect crust. This is the best dutch oven for bread in my opinion.

Few things taste or smell better than fresh homemade yeast bread. Unless, of course, it's homemade bread topped with creamy homemade butter.

If you have a stand mixer, the process for creating homemade butter couldn't be more simple. Add heavy cream to the bowl and mix on a high speed until it becomes butter. Done. You can also try this method in a food processor. I've even heard of adding a bit of cream to empty baby food jars and letting your kiddos shake them until butter forms as a fun kitchen project!

Now we're talkin'.
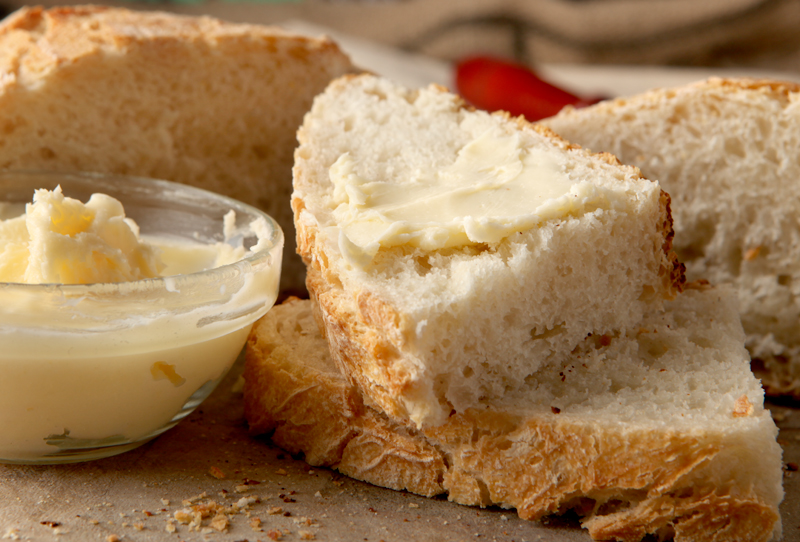
The outside of the bread is crunchy, the inside perfectly chewy, and that butter is creamy heaven. Enjoy!
Print
Homemade Bread and Butter
- Total Time: 2 hours
- Yield: 1 loaf, ½ cup butter
Ingredients
- Homemade Crusty Bread
- 2 ¼ tsp active dry yeast (1 packet)
- 1 tsp sugar
- 1 ¼ cups warm water
- 1 ½ tsp kosher salt
- 2.5 - 3 cups all purpose flour, plus extra
- Homemade Butter
- 1 cup heavy cream (35% milk fat)
Instructions
- In the bowl of a stand mixer, combine the yeast, sugar, and warm water. Allow the mixture to stand for about 5 minutes until it starts to look foamy.
- Add the salt, and then turn the mixer on low speed and begin adding the flour a little at a time until the mixture begins to come together to a smooth dough. You don't want the dough to be overly wet and sticky and you also don't want it to be dry and crumbly. You may not use all of the flour indicated in the ingredients list.
- Remove the dough hook and lightly dust the top of the dough with flour and gently pat it around, then turn the dough over and do the same with the other side. This is to help prevent the dough from sticking to the sides of the bowl.
- Cover bowl with a towel and set in a warm place for at least an hour or until the dough has doubled in size.
- Once the dough has risen, lightly flour a work surface and your hands. Very gently transfer the dough out of the bowl and onto the surface, being careful not to punch down the dough. Shape the dough into a symmetrical round loaf and return the dough to the bowl. Cover with a towel and set in a warm place for an additional 30 minutes.
- While the dough is rising, place a Dutch oven (see notes!) with the lid on inside your oven and preheat to 460F.
- When the oven is preheated, use oven mitts to very carefully remove the Dutch oven and *carefully* transfer the dough inside, being careful not to punch down the dough and not to burn yourself. Replace the lid and return to the oven.
- Bake for about 30 minutes or until a nice golden crust has formed. Remove the lid and bake for an additional 10-20 minutes or until the crust deepens in color a bit more. Remove the Dutch oven using mitts.
- Use a large, wide spatula to remove the bread from the Dutch oven and place onto a cooling rack for about 15 minutes before slicing.
- Homemade Butter
- Add the cream to the bowl of a stand mixer fitted with the whisk attachment. Whisk on medium high speed until soft peaks form. Scrape down the bowl and then continue mixing until the mixture starts to form thick chunks. Scrape down the bowl again and continue mixing until the solids fully separate from the liquid (see photos above). This will take some time - about 10-15 minutes, or it may take longer. Be patient - it'll get there!
- Place a fine mesh strainer over a bowl and pour the solids and liquid through the strainer, using your hands to push out excess liquid. The liquid in the bowl is buttermilk and you can save it to use for baking!
- Slather butter over bread and store leftovers in the refrigerator.
Notes
Make sure your Dutch oven is safe to be preheated (check owner's guide for your particular pot) and make sure you place the cold pot into the cold oven so it can gradually come to temperature.
- Prep Time: 90 mins
- Cook Time: 30 mins
Save this recipe for later! Use the Pinterest ready image below. Just hover your mouse over the photo and click the button that shows up!

Have a great week!

Kara@K&R Adventures
This bread looks like the perfect yeast loaf served up alongside dinner! Yum. The butter we've made in the past called for both heavy cream and sour cream. A quick google search and I've found that using heavy cream alone provides a nice sweet cream butter, but adding live culture found sour cream you will have European style or cultured butter! How interesting!!
Erin
Oh that's so cool, I didn't know that! I love learning little tidbits like that!