
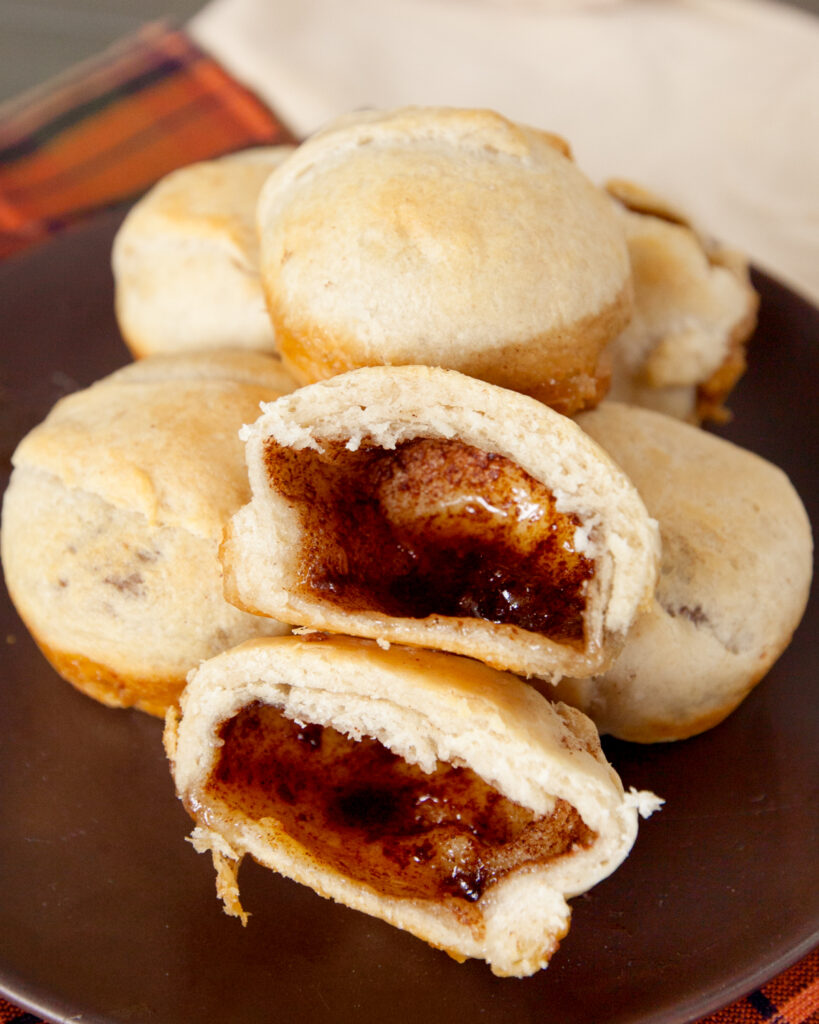
These Hocus Pocus buns start with a jumbo marshmallow dipped in melted butter and coated in cinnamon sugar. The marshmallows get wrapped in crescent roll dough and then baked. The marshmallow melts into the dough when baking, leaving a hollow, cinnamon-sugar center! Hocus Pocus!
What's With The Name?
Buns like these go by many names depending on the time of year they are baked. When created during the spooky season, they're known as Hocus Pocus Buns. When made at Easter, they're often called Resurrection Rolls or Empty Tomb Rolls, with the hollow center meant to represent the empty cave after the resurrection of Jesus.
Whatever you call them, the idea is the same. Crescent roll dough gets stuffed with a marshmallow dipped in melted butter and coated with cinnamon sugar. When the rolls bake, the marshmallow melts and is absorbed by the dough, leaving behind a hollow center. Hocus Pocus - it disappeared!
Ingredients
You only need a few simple ingredients to create Hocus Pocus Buns, so let's take a look at them:
- Crescent Rolls - use your favorite brand of canned crescent rolls. This recipe is scaled for a can of 8 rolls.
- Marshmallows - you'll need 8 jumbo marshmallows, one for each roll.
- Butter - 3 tablespoons of melted butter is all you need. You can use salted or unsalted.
- Cinnamon and Sugar - use the premade variety you can find in the spice aisle or use the ratios in the recipe to mix your own
Instructions
Here's what to do to bring them all together!
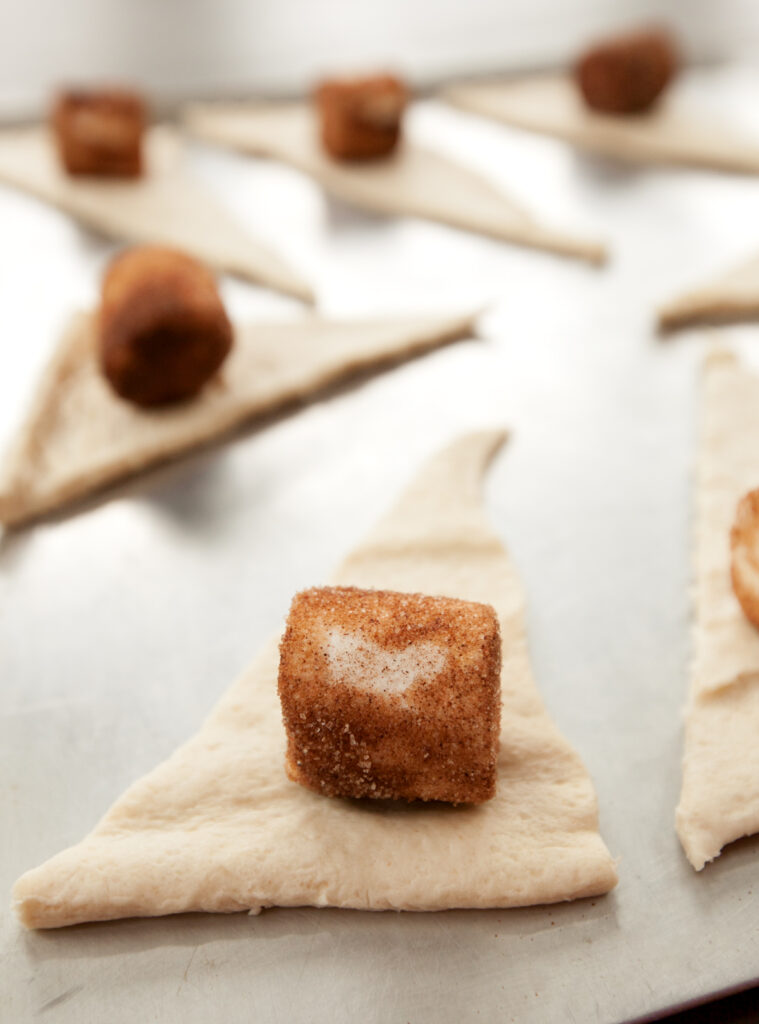
Step 1: Separate crescent roll dough onto a greased baking sheet. Dip marshmallows first in melted butter, then roll them into the cinnamon sugar. Place a marshmallow on the wide end of each dough triangle.
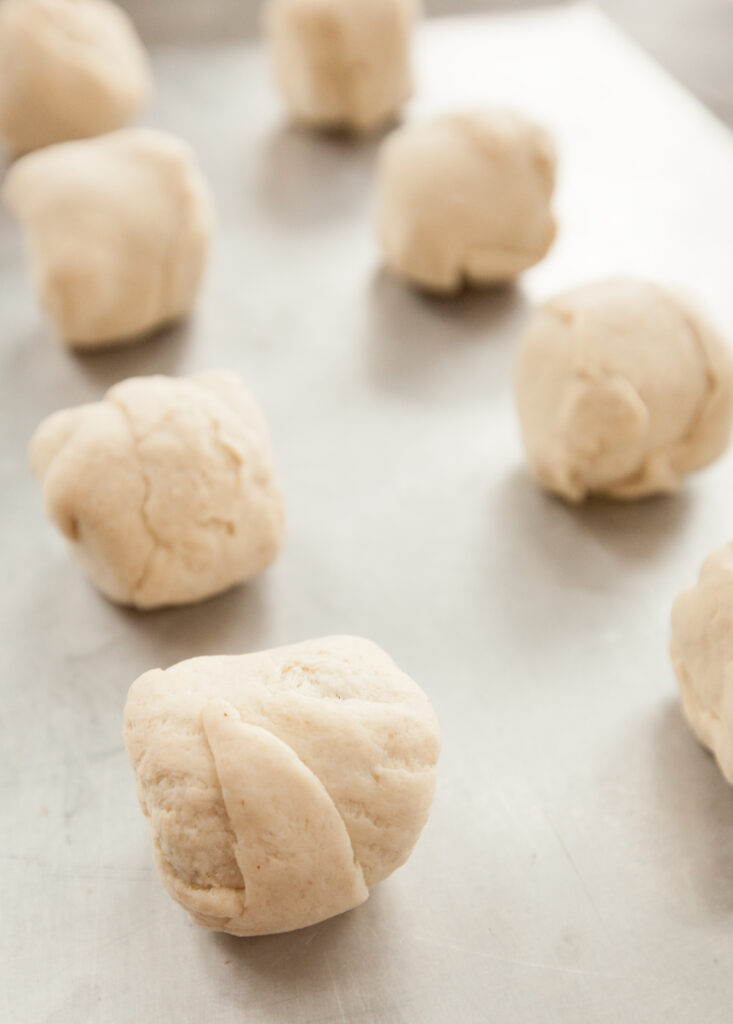
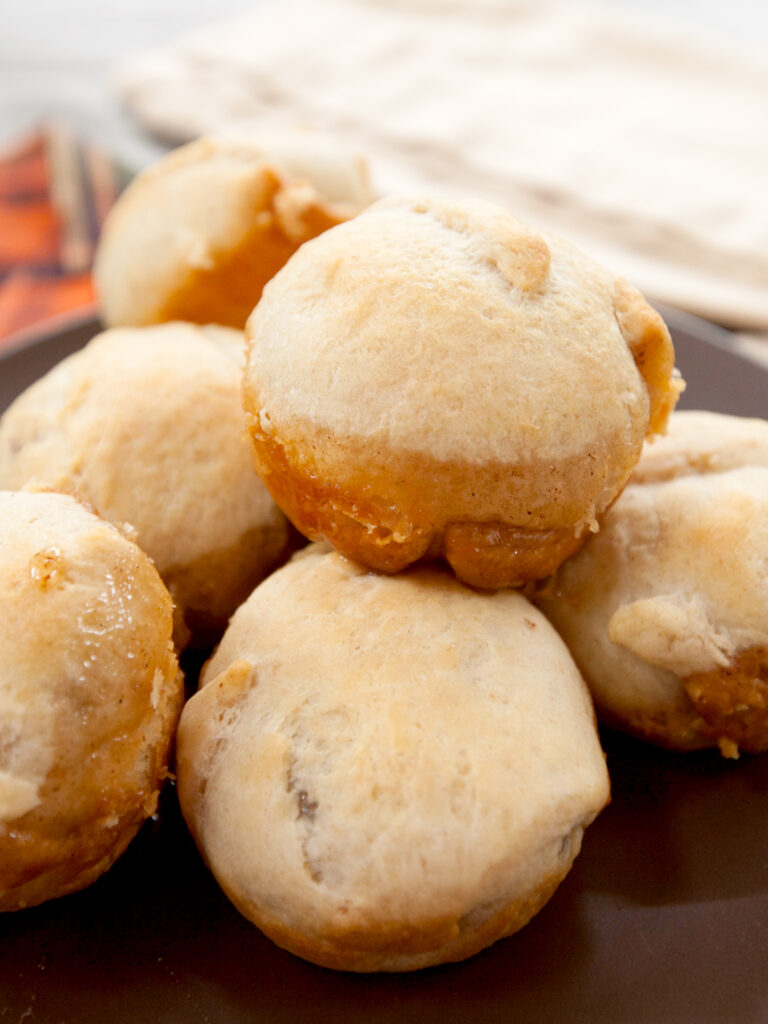
Step 2: Roll up each triangle and make sure to pinch all the openings shut. Place rolled up dough into each well of a muffin tin and bake at 375F for about 12 minutes or until golden. Let them cool slightly and serve while warm!
Fun Variations
- Chocolate Marshmallow - try a flavored marshmallow for fun! If you don't like chocolate with cinnamon, just leave it out.
- Colored (or fruity) Marshmallow - using a colored marshmallow will add a fun surprise when you bite into the rolls.
- Sprinkles - brush the outside of the rolls with more melted butter and add some colorful sprinkles to make your buns match the season.
- Spice it up - instead of plain cinnamon, try pumpkin pie spice or apple pie spice. These spice combinations are a little stronger than plain cinnamon, so reduce the amount in your sugar mix to 2 tsp.
Tips For Success
Seal Those Rolls! Take your time when pinching the edges of the dough together, otherwise all of the marshmallow will leak right out of the buns and create a sticky mess. Even with care you may still pop a few small leaks, but they're not a big deal as long as overall the roll is well-sealed.
Use A Muffin Tin. Most recipes you see for Hocus Pocus Buns will have you bake them on a standard cookie sheet, and this works out just fine, but I loved how round and shapely they ended up being when using a muffin tin!
Serve Them Fresh. If you're familiar with using canned crescent roll dough, you probably know that they tend to firm up or get dry quite quickly. These are best served fresh from the oven while the rolls are soft and the melted marshmallow is ooey gooey.
Frequently Asked Questions
I recommend making these one batch at a time and serving soon after baking. Over time the melted marshmallow will become stiff, which alters the texture of the bun. If you have to store them, you can keep them at room temperature in an airtight container for a couple of days. To reheat, wrap in a damp paper towel and microwave for about 10 seconds.
Sure! Try mixing the white sugar with pumpkin pie spice or apple pie spice for a fun variation.
Yes, you can! Follow the recipe through step 6. Place unbaked rolls into a freezer-safe bag and freeze until ready to use. When ready to bake, allow them to thaw on your counter before baking as instructed.

Hocus Pocus Buns
These fun spooky season treats start with crescent roll buns stuffed with a cinnamon sugar marshmallow that disappears as the buns bake, leaving behind a sweet hollow center.
- Total Time: 28 mins
- Yield: 8 buns 1x
Ingredients
- 1 can of crescent roll dough - 8 count
- 8 large marshmallows
- 3 TBS butter, melted
- ¼ cup white granulated sugar
- 1 TBS ground cinnamon
Instructions
- Preheat oven to 375F. Spray 8 compartments in a muffin tin with cooking spray and set aside.
- Open up the crescent roll dough and separate into triangles. Lay out the triangles on a tray or baking sheet.
- In a small bowl, mix together the cinnamon and sugar.
- Dip a marshmallow into the melted butter, making sure it's fully coated. Then dip the marshmallow into the cinnamon sugar, rotating to coat on all sides.
- Place the marshmallow on the wide end of a dough triangle. Repeat with remaining marshmallows.
- Roll up each triangle, starting with the wide end. Take your time and pinch together the seams on the dough, being certain that all holes and edges are well-sealed (the marshmallow will leak out otherwise).
- Place each bun into the prepared muffin tin. Bake on center rack for 11-13 minutes or until lightly golden.
- Let the buns cool in the pan for a few minutes and then loosen with a butter knife and serve warm.
- Prep Time: 15 mins
- Cook Time: 13 mins
- Category: Dessert
- Method: Oven
- Cuisine: N/A
Nutrition
- Serving Size: 1 bun
- Calories: 186
- Sugar: 12g
- Fat: 10g
- Saturated Fat: 6g
- Carbohydrates: 24g
- Fiber: 0.5g
- Protein: 1g
Not making this recipe just yet? Use the photo below to Pin to your Pinterest boards. If you want to share with your friends, use the buttons at the top or bottom of this post to share on social media. Thank you so much for visiting!

Susie
Amazing!! A couple of mine leaked (my fault for not sealing the dough well enough) but they were so cute and delicious!